Hugo Blowfish 網頁建置流程#
簡單記錄建起這個Blowfish Lab網頁的流程,目前也還在逐步改善成理想的狀態。
架構選擇#
首先跟ChatGPT討論要使用哪種框架來建構這個網頁,主要的需求為
- 類似docs,用來累積一些技術文件、筆記
- 使用markdown管理,方便與obsidian筆記之間的轉換,不額外造成時間成本負擔
- 簡單好看
- 可透過github page進行部署 (主要想嘗試的部分)
過程中討論出了幾個選項
其實這三者都挺好看的,或許未來哪天突然就想嘗試。在了解Hugo Paper的過程意外發現Blowfish主題,意外的好看 (深藍背景真好),就決定是他了。
網頁建置#
1. 下載必要工具#
- 先下載Go, Hugo
- 解壓縮後,設置環境變數,在
path選項中 新增 “C:\Tools\hugo_extended_0.148.2_windows-amd64” (替換成解壓縮的路徑) - 開啟Powershell 輸入
hugo version
確認是否安裝成功
hugo v0.148.2-40c3d8233d4b123eff74725e5766fc6272f0a84d+extended windows/amd64 BuildDate=2025-07-27T12:43:24Z VendorInfo=gohugoio
2. 網站初步架設#
- 在你想要建立網站的資料夾中,執行:
hugo new site .
會顯示以下內容
Congratulations! Your new Hugo site was created in C:\Users\Dodo\desktop\my-blowfish-site.

Just a few more steps...

1. Change the current directory to C:\Users\Dodo\desktop\my-blowfish-site.
2. Create or install a theme:
   - Create a new theme with the command "hugo new theme <THEMENAME>"
   - Or, install a theme from https://themes.gohugo.io/
3. Edit hugo.toml, setting the "theme" property to the theme name.
4. Create new content with the command "hugo new content <SECTIONNAME>\<FILENAME>.<FORMAT>".
5. Start the embedded web server with the command "hugo server --buildDrafts".

See documentation at https://gohugo.io/.
- 接著,將 Blowfish 主題安裝為 Git Submodule
git init
git submodule add https://github.com/nunocoracao/blowfish.git themes/blowfish
- 再來將
\themes\blowfish\config\_default\底下的所有config文件複製到\config\_default - 再來執行
hugo server
最簡單的頁面就建構完成,可開啟瀏覽器,前往 http://localhost:1313/ 進行預覽
3. 自訂網頁內容#
首先可以先刪除根目錄的hugo.toml檔案 (hugo預設自動產生的,不需要)
主要的配置調整集中在\config\_default 的 hugo.toml, languages.en.toml, params.toml, menus.en.toml 這四個文件
而主要的頁面內容會在\content資料夾底下,\assets資料夾放全域共用的圖片
接下來的步驟可以自己決定,基本上就是客製化網站的部分。以下我嘗試了幾種流程
- 完全複製blowfish官方demo頁面的內容,再逐步刪除無用的內容
只能說內容有點太多雜訊了Copy-Item themes\blowfish\exampleSite\* . -Recurse -Force - 聽ChatGPT的建議,按照其指示輸入指令 (他會建議不複製content,只複製官方config)
- 參考Blowfish Docs的順序逐步處理 (會在config時失去方向)
- 完全交給Cursor自動處理(最混亂)
- 參考Blowfish作者Nuno Coração的Blog。推薦這個,但稍微也沒這麼適合新手
最後自己最推薦參考Ken Harris的Youtube教學
看完一遍後,可以更理解Hugo Blowfish的架構,後半段的css shortcode可以忽略(小混亂)。我是看完教學後,依據印象在一步一步去調整整個頁面的。
4. 建議設置順序#
- 完成初步設置後,開啟
Hugo Server進行即時預覽 (有時有bug會卡住,就重新啟動) - 在
\Content中新增幾篇測試用文章 - 修改
\config\_default\hugo.toml以下這些部分theme = "blowfish" # UNCOMMENT THIS LINE baseURL = "https://dodo13114arch.github.io/blowfish-lab/" # 未來網域設置,先忽略 defaultContentLanguage = "en" # 主要語言 (我是以英文為主) - 接著調整主頁配置。主要修改
\config\_default\languages.en.toml、搭配params.toml中的[homepage]部分 - 調整Header(下圖右側選單部分),設計簡易的網站架構。修改
menus.en.toml!
- 設計List頁面的配置。調整
params.toml中的[list]部分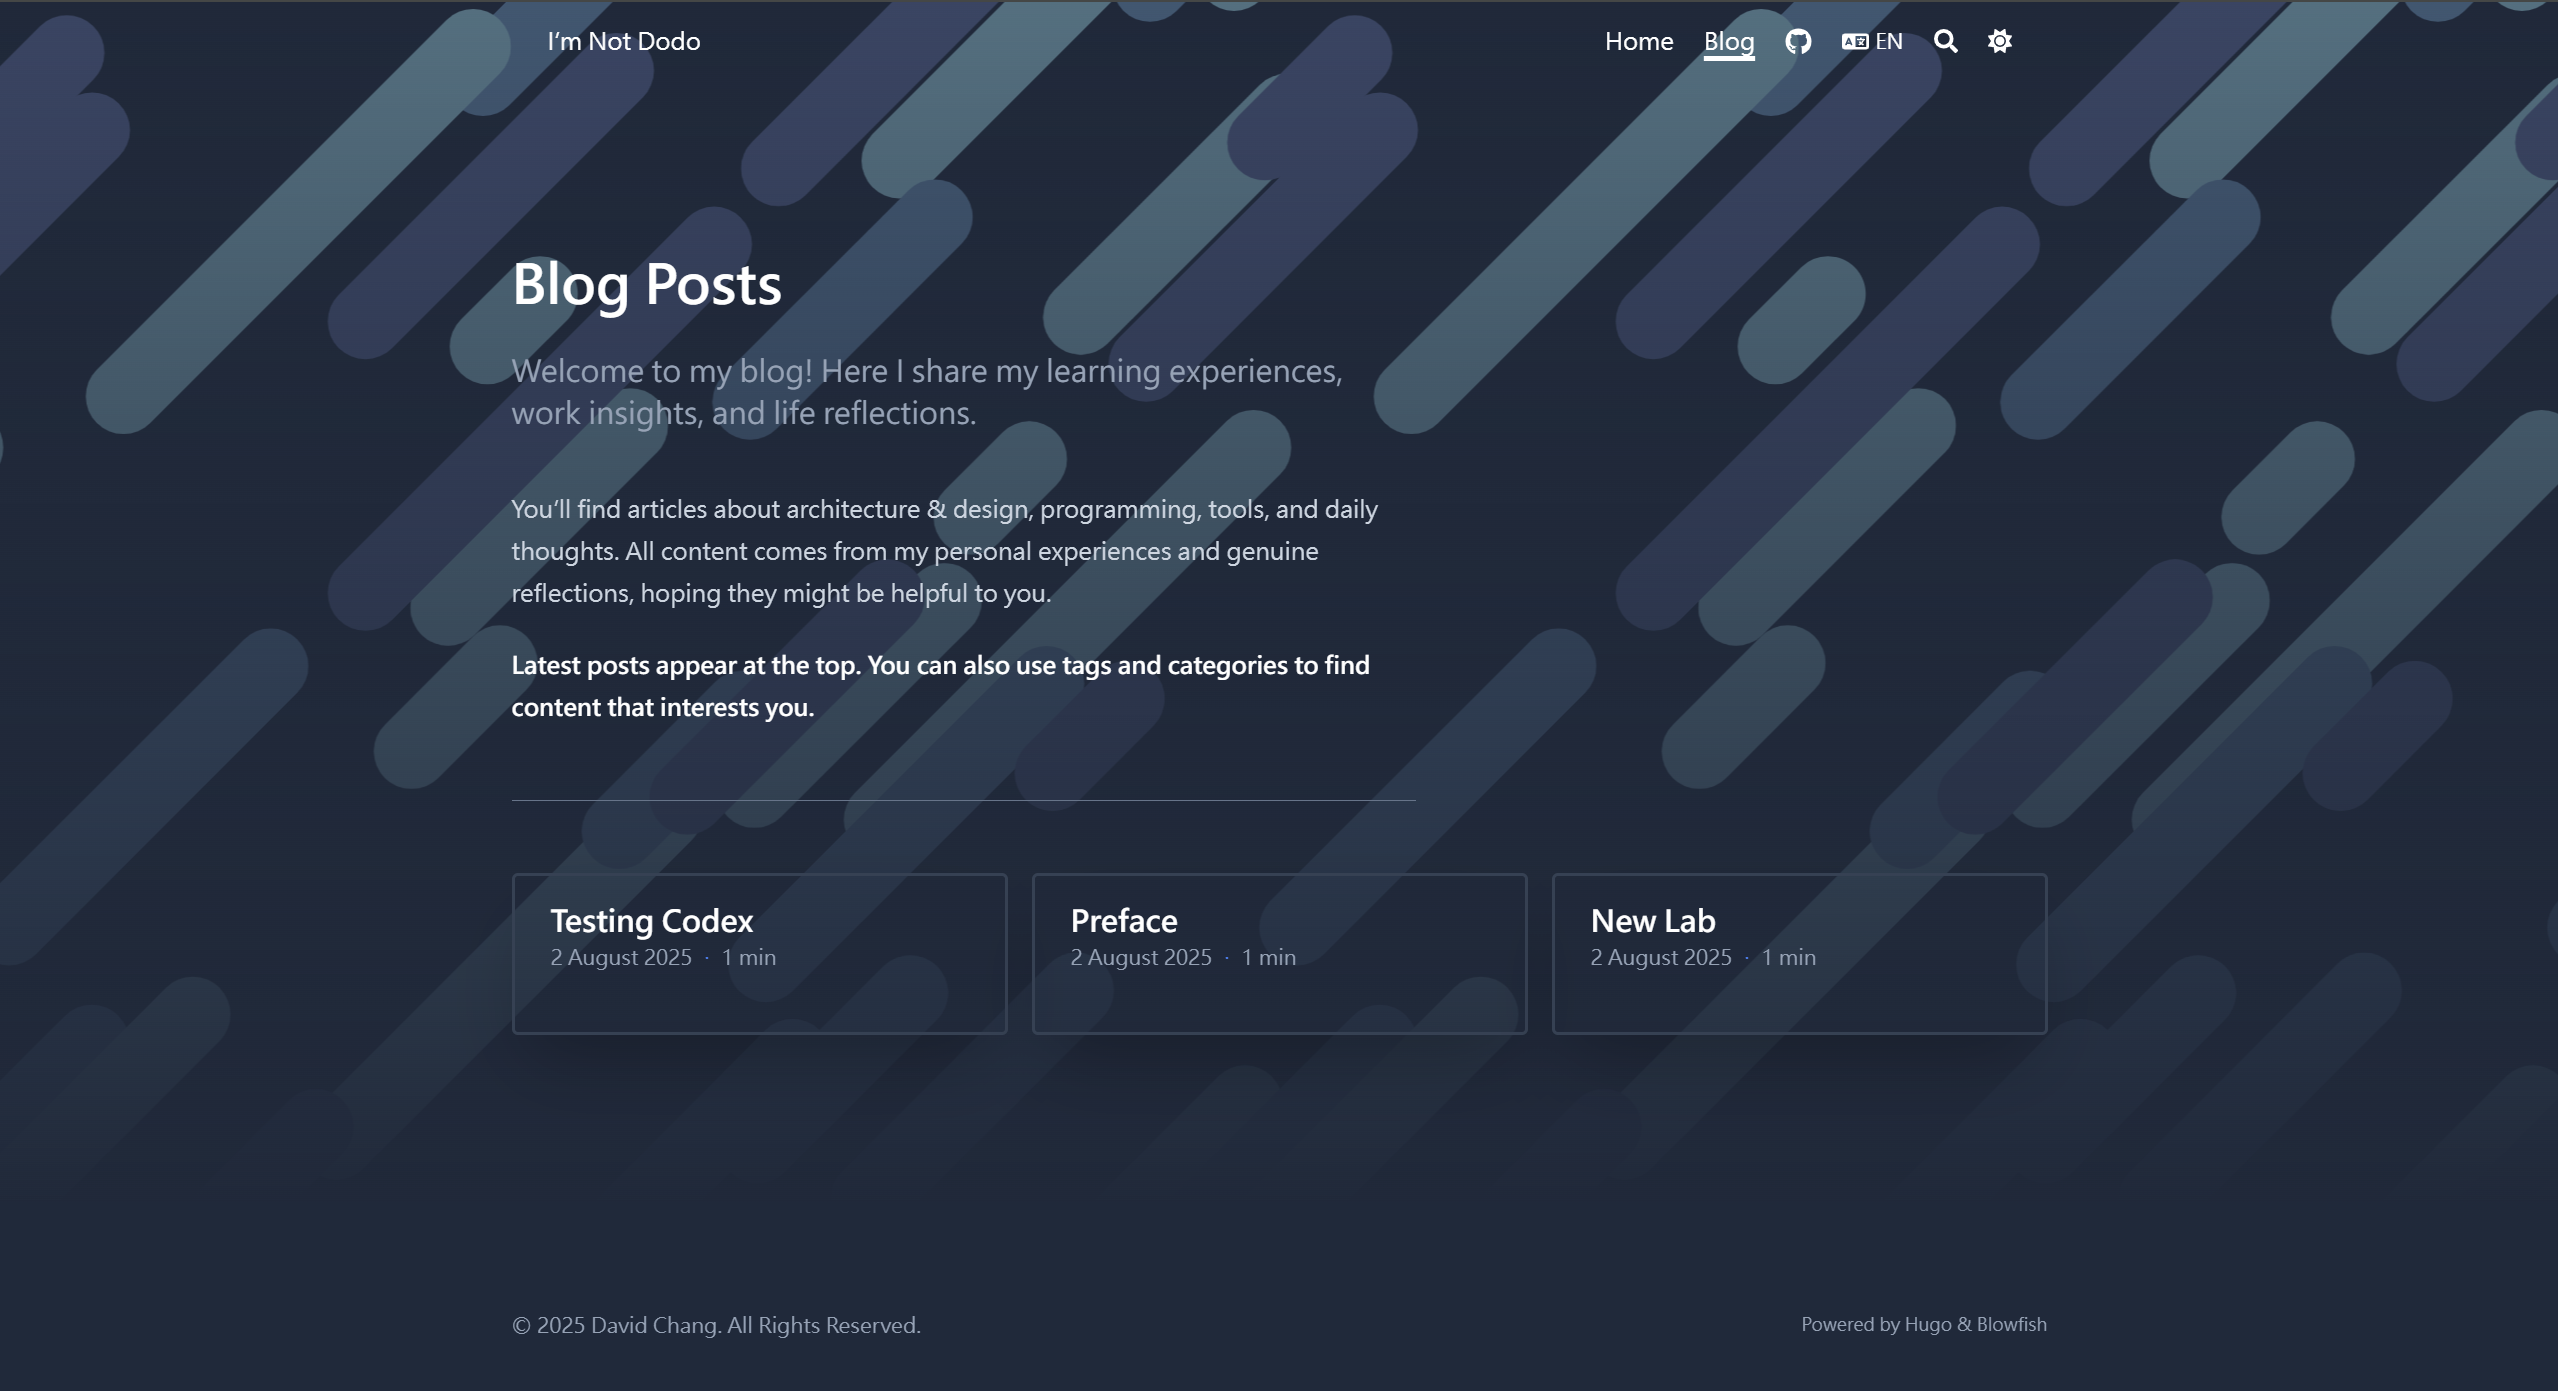
- 最後再調整blog文章的配置。調整
params.toml中的[articles]部分
部署 Github Page#
首先先連線至Github Repo (public),branch放在main
確認\config\_default\hugo.toml的baseURL設置成github page的網址
"https://dodo13114arch.github.io/blowfish-lab/" # 我的,供參考
在根目錄下創建資料夾\.github,在底下創建 \workflows資料夾
在workflows下建立檔案gh-pages.yml,內容可以直接參考以下 (cursor創建的哈哈)
name: GitHub Pages

on:
  push:
    branches:
      - main

jobs:
  build-deploy:
    runs-on: ubuntu-24.04
    concurrency:
      group: ${{ github.workflow }}-${{ github.ref }}
    steps:
      - name: Checkout
        uses: actions/checkout@v3
        with:
          submodules: true
          fetch-depth: 0

      - name: Setup Hugo
        uses: peaceiris/actions-hugo@v2
        with:
          hugo-version: "latest"

      - name: Build
        run: hugo --minify

      - name: Deploy
        uses: peaceiris/actions-gh-pages@v3
        if: ${{ github.ref == 'refs/heads/main' }}
        with:
          github_token: ${{ secrets.GITHUB_TOKEN }}
          publish_branch: gh-pages
          publish_dir: ./public
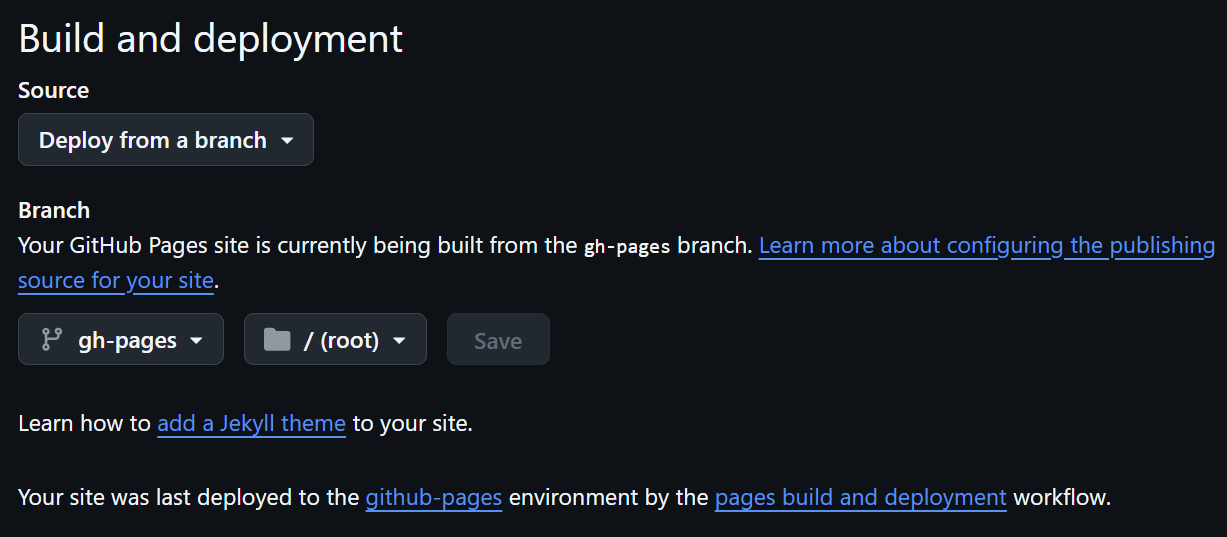
接著在github repo的部分開啟Settings,開啟Pages
Build and deployment 的 Source 設置 Deploy from a branch
branch設置 gh-pages、/(root) ,按save儲存
將檔案commit、push到github中,理論上就會開始跑了 (首次部署需要等待一小段時間)
常見問題#
以下紀錄我部署時遇到的問題,包含AI提供的解決辦法
Hugo Server 預覽連結錯誤#
在設置完baseURL導致有些按鈕或連結會出錯,用以下方式啟動預覽SERVER就可以解決
含草稿預覽
hugo server -D --baseURL="http://localhost:1313/"
無草稿
hugo server --baseURL="http://localhost:1313/"
github pages 部署失敗#
問題:
權限錯誤
錯誤分析:
remote: Permission to <用戶名>/<repository>.git denied to github-actions[bot]. fatal: unable to access 'https://github.com/<用戶名>/<repository>.git/': The requested URL returned error: 403
原因:github-actions[bot] 沒有權限推送到 gh-pages 分支。
解決方案
方案 1:檢查 Repository 權限設定
前往 Repository 設定頁面:
https://github.com/<用戶名>/<repository>/settings/actions檢查 Workflow permissions:
在頁面底部找到 Workflow permissions
確保選擇:「Read and write permissions」
勾選:「Allow GitHub Actions to create and approve pull requests」
資源#
更多資源可以參考官方Docs Shortcodes
總結#
以上以流水帳的方式記錄架設這個網頁的過程,希望可以給入門的新手一些參考方向。