Hugo Blowfish Website Setup Process#
A simple record of the process for building this Blowfish Lab website, which is still being gradually improved to reach an ideal state.
Architecture Selection#
First, I discussed with ChatGPT about which framework to use for building this website. The main requirements were:
- Similar to docs, for accumulating some technical documents and notes
- Use markdown management for easy conversion between Obsidian notes without creating additional time cost burden
- Simple and good-looking
- Can be deployed through GitHub Pages (the main part I wanted to try)
During the discussion, several options emerged:
Actually, all three look quite good, maybe I’ll try them someday. While learning about Hugo Paper, I accidentally discovered the Blowfish theme, which is surprisingly beautiful (the dark blue background is really nice), so I decided on it.
Website Construction#
1. Download Necessary Tools#
- First download Go, HugoImportant Note: Be sure to download the Extended version of Hugo, otherwise some features of the Blowfish theme will fail.
- After extracting, set environment variables, add “
C:\Tools\hugo_extended_0.148.2_windows-amd64” to thepathoption (replace with your extraction path) - Open Powershell and enter
hugo version
Confirm successful installation
hugo v0.148.2-40c3d8233d4b123eff74725e5766fc6272f0a84d+extended windows/amd64 BuildDate=2025-07-27T12:43:24Z VendorInfo=gohugoio
2. Initial Website Setup#
- In the folder where you want to create the website, execute:
hugo new site .
Will display the following content
Congratulations! Your new Hugo site was created in C:\Users\Dodo\desktop\my-blowfish-site.

Just a few more steps...

1. Change the current directory to C:\Users\Dodo\desktop\my-blowfish-site.
2. Create or install a theme:
   - Create a new theme with the command "hugo new theme <THEMENAME>"
   - Or, install a theme from https://themes.gohugo.io/
3. Edit hugo.toml, setting the "theme" property to the theme name.
4. Create new content with the command "hugo new content <SECTIONNAME>\<FILENAME>.<FORMAT>".
5. Start the embedded web server with the command "hugo server --buildDrafts".

See documentation at https://gohugo.io/.
- Next, install the Blowfish theme as a Git Submodule
git init
git submodule add https://github.com/nunocoracao/blowfish.git themes/blowfish
- Then copy all config files from
\themes\blowfish\config\_default\to\config\_default - Then execute
hugo server
The simplest page is now constructed, you can open a browser and go to http://localhost:1313/ for preview
3. Customize Website Content#
First, you can delete the hugo.toml file in the root directory (automatically generated by Hugo by default, not needed)
Main configuration adjustments are concentrated in the four files hugo.toml, languages.en.toml, params.toml, menus.en.toml in \config\_default
The main page content will be in the \content folder, and the \assets folder stores globally shared images
The next steps can be decided by yourself, basically the customization part of the website. I tried several processes below:
- Completely copy the content of the blowfish official demo page, then gradually delete useless content
Can only say the content has a bit too much noiseCopy-Item themes\blowfish\exampleSite\* . -Recurse -Force - Follow ChatGPT’s suggestions and input commands according to its instructions (it will suggest not copying content, only copying official config)
- Follow the order of Blowfish Docs step by step (will lose direction when configuring)
- Completely let Cursor handle it automatically (most chaotic)
- Refer to the Blowfish author Nuno Coração’s Blog. Recommended, but also not very suitable for beginners
Finally, I most recommend referring to Ken Harris’s Youtube tutorial
After watching it once, you can better understand the architecture of Hugo Blowfish, the latter half of css shortcode can be ignored (a bit chaotic). I watched the tutorial and then adjusted the entire page step by step based on my impression.
4. Recommended Setup Order#
- After completing initial setup, open
Hugo Serverfor real-time preview (sometimes there are bugs that get stuck, just restart) - Add a few test articles in
\Content - Modify the following parts in
\config\_default\hugo.tomltheme = "blowfish" # UNCOMMENT THIS LINE baseURL = "https://dodo13114arch.github.io/blowfish-lab/" # Future domain setting, ignore for now defaultContentLanguage = "en" # Main language (I use English as primary) - Then adjust homepage configuration. Mainly modify
\config\_default\languages.en.toml, combined with the[homepage]section inparams.toml - Adjust Header (right menu part in the image below), design simple website architecture. Modify
menus.en.toml!
- Design List page configuration. Adjust the
[list]section inparams.toml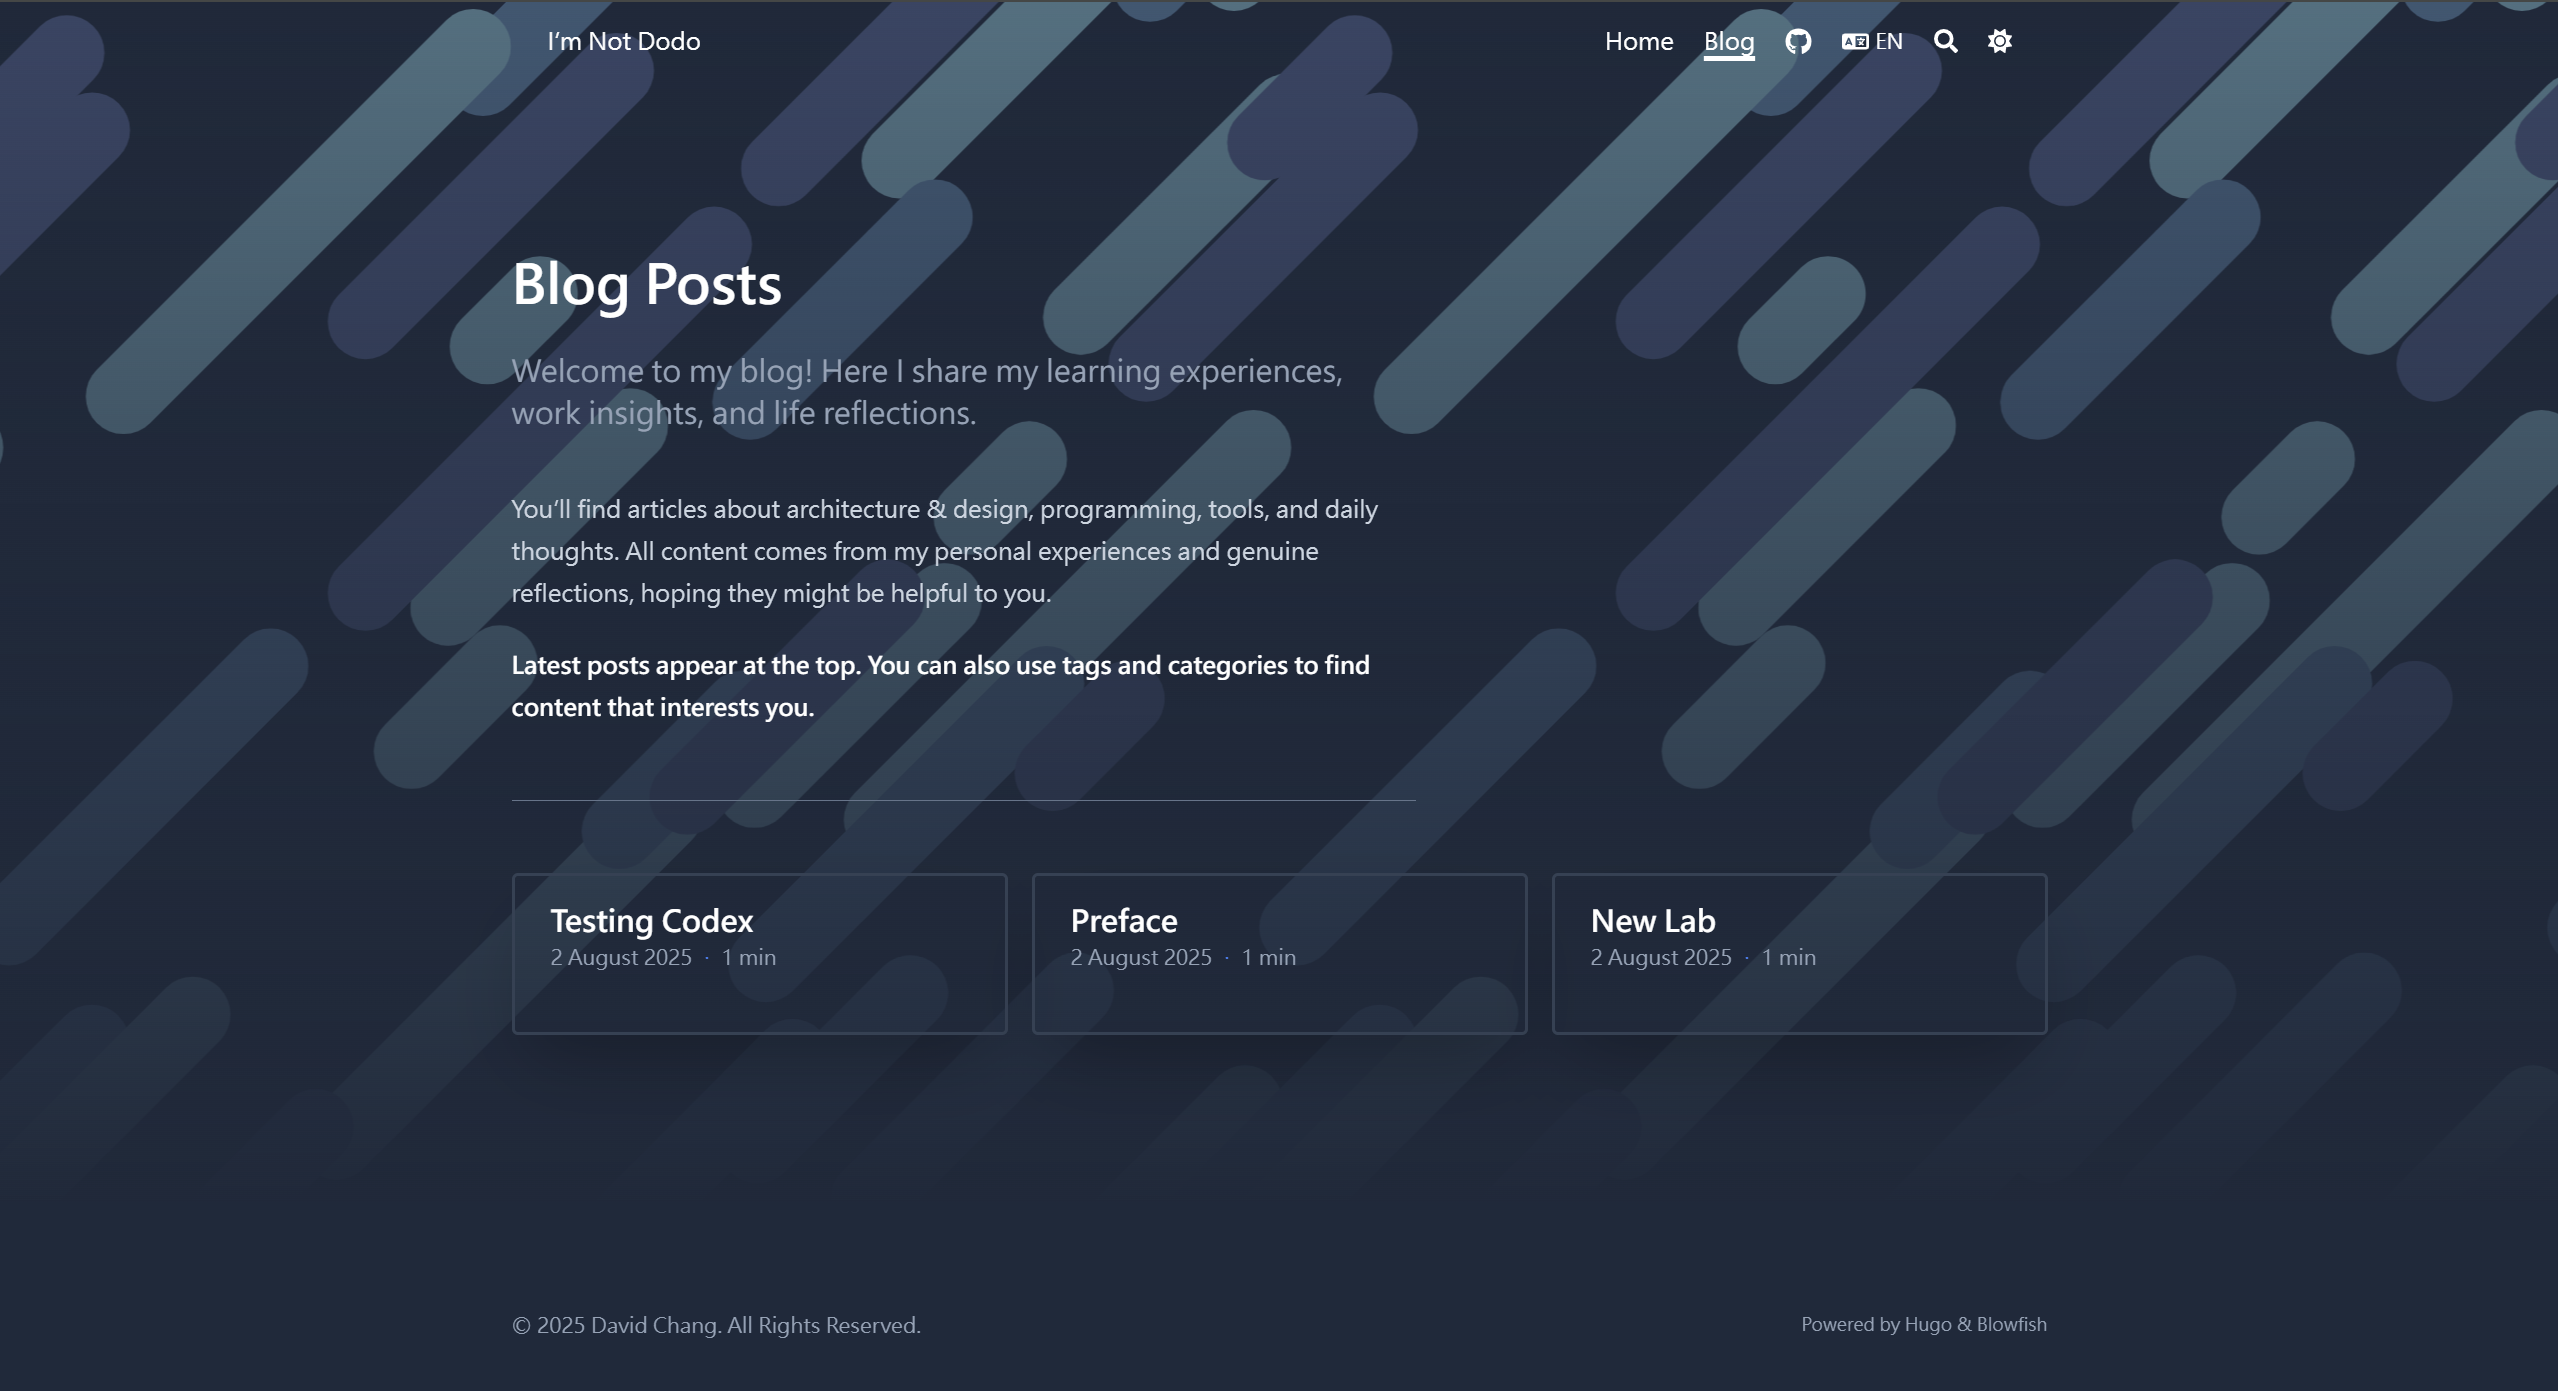
- Finally adjust blog article configuration. Adjust the
[articles]section inparams.toml
Deploy Github Page#
First connect to Github Repo (public), branch on main
Confirm that baseURL in \config\_default\hugo.toml is set to the github page URL
"https://dodo13114arch.github.io/blowfish-lab/" # Mine, for reference
Create folder \.github in the root directory, create \workflows folder underneath
Create file gh-pages.yml in workflows, content can directly refer to the following (created by cursor haha)
name: GitHub Pages

on:
  push:
    branches:
      - main

jobs:
  build-deploy:
    runs-on: ubuntu-24.04
    concurrency:
      group: ${{ github.workflow }}-${{ github.ref }}
    steps:
      - name: Checkout
        uses: actions/checkout@v3
        with:
          submodules: true
          fetch-depth: 0

      - name: Setup Hugo
        uses: peaceiris/actions-hugo@v2
        with:
          hugo-version: "latest"

      - name: Build
        run: hugo --minify

      - name: Deploy
        uses: peaceiris/actions-gh-pages@v3
        if: ${{ github.ref == 'refs/heads/main' }}
        with:
          github_token: ${{ secrets.GITHUB_TOKEN }}
          publish_branch: gh-pages
          publish_dir: ./public
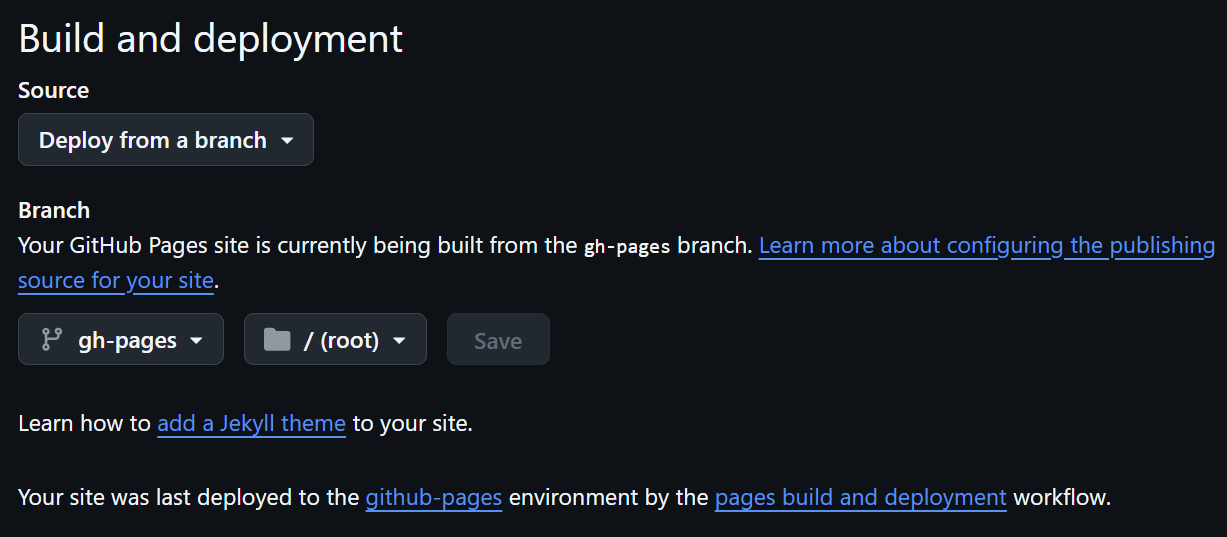
Then open Settings in github repo, open Pages
Set Build and deployment Source to Deploy from a branch
Set branch to gh-pages, /(root), press save to save
Commit and push files to github, theoretically it will start running (first deployment needs to wait for a short period of time)
Common Issues#
The following records issues I encountered during deployment, including solutions provided by AI
Hugo Server Preview Link Error#
After setting baseURL, some buttons or links may have errors, use the following method to start preview SERVER to solve
Including draft preview
hugo server -D --baseURL="http://localhost:1313/"
No draft
hugo server --baseURL="http://localhost:1313/"
github pages deployment failure#
Problem:
Permission error
Error Analysis:
remote: Permission to <username>/<repository>.git denied to github-actions[bot]. fatal: unable to access 'https://github.com/<username>/<repository>.git/': The requested URL returned error: 403
Reason: github-actions[bot] doesn’t have permission to push to gh-pages branch.
Solution
Solution 1: Check Repository Permission Settings
Go to Repository settings page:
https://github.com/<username>/<repository>/settings/actionsCheck Workflow permissions:
Find Workflow permissions at the bottom of the page
Ensure selection: “Read and write permissions”
Check: “Allow GitHub Actions to create and approve pull requests”
Resources#
For more resources, you can refer to the official Docs Shortcodes
Summary#
The above records the process of building this website in a stream-of-consciousness manner, hoping to provide some reference direction for beginners.